FREE! Click here to Join FunTrivia. Thousands of games, quizzes, and lots more!
Under A Microscope! Trivia Quiz
This microscope reminds me of the kind I used in college back in the day. Want to take a trip down memory lane with me to see what you remember? Come on!
A label quiz
by ponycargirl.
Estimated time: 3 mins.
Last 3 plays: GoodVibe (7/10), Guest 70 (6/10), Dizart (4/10).
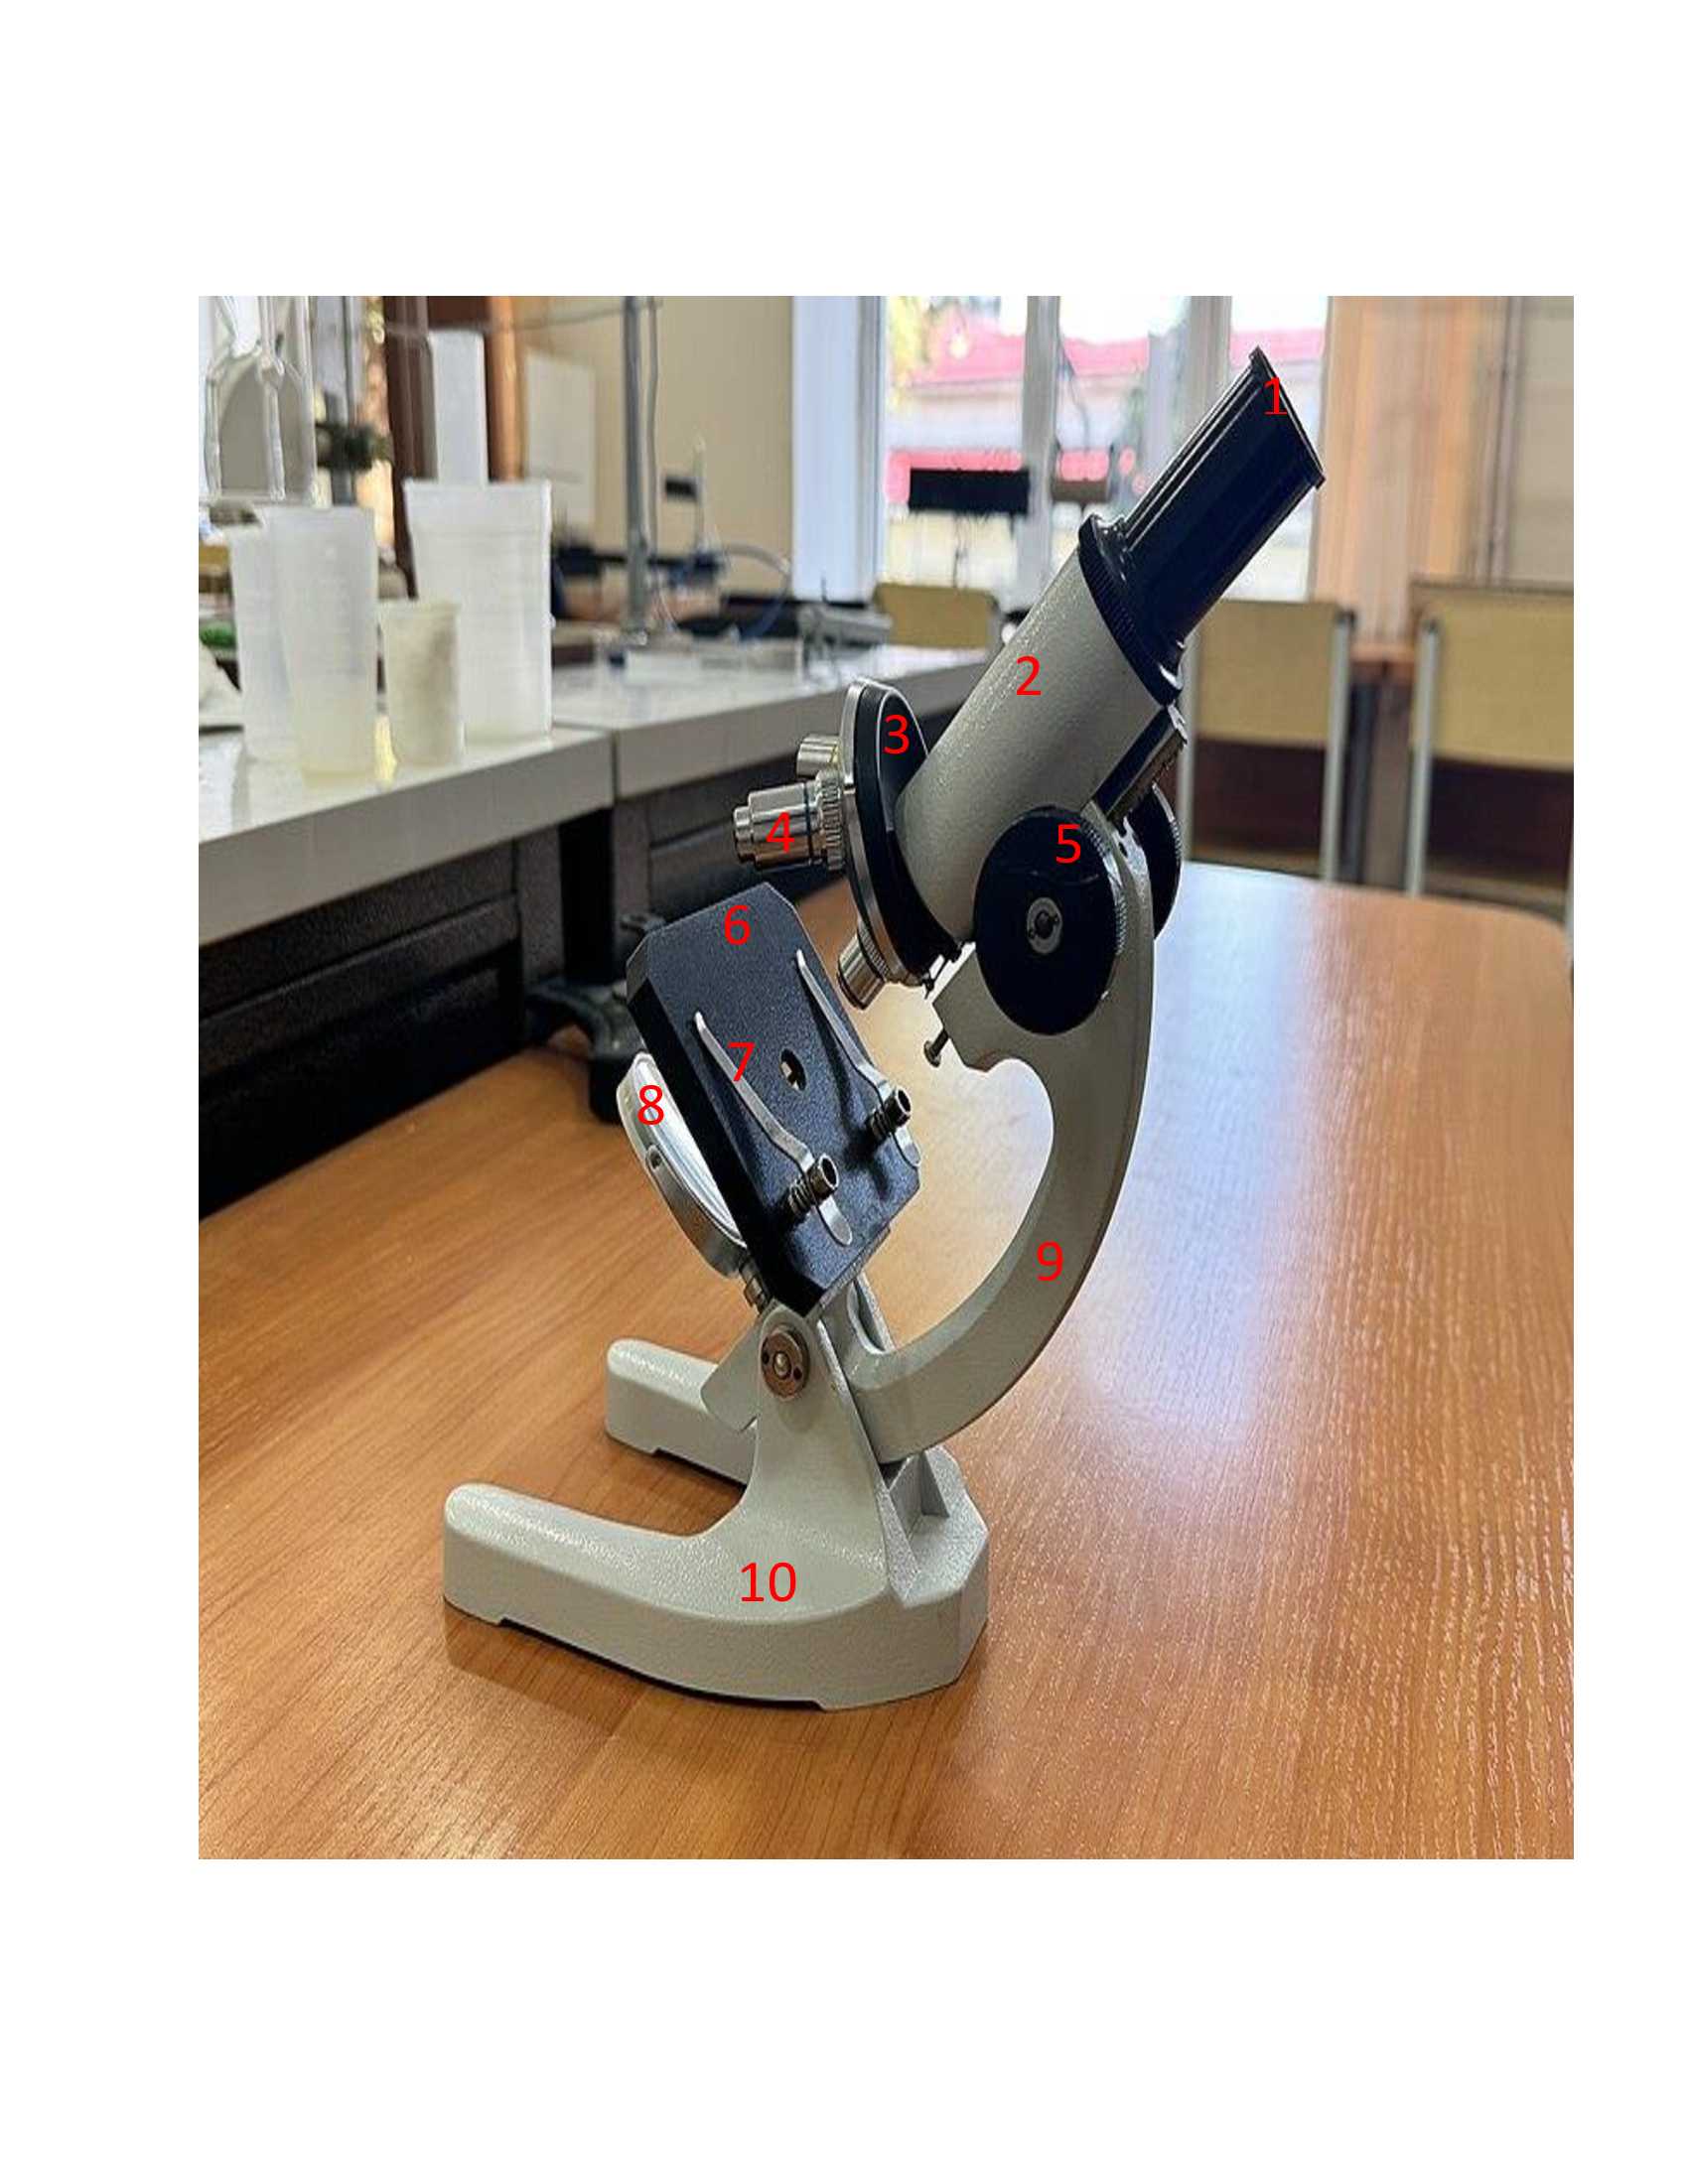
Identify the parts that are labeled on the microscope!
Click on image to zoom
IlluminatorNosepieceCoarse FocusStage ClipsTubeStageBaseLarge Objective LensEye Piece LensArm* Drag / drop or click on the choices above to move them to the answer list.
Looking through the eye piece lens is the first step in using a microscope. Typically the eye piece lens is 10x or 15x power. Compound microscopes typically have two eyepieces, which give the user binocular vision.
The eye piece lens is important because it further magnifies the image that has already been created by the other lenses, which helps to give more detail to the specimen that is being studied. It also helps to increase how much of the specimen can be viewed.
Consequently, it is very important to take good care of the eye piece, and keep it clean using the correct cleaning solution and lens paper. Using compressed air may be all the cleaning the eye piece needs. Above all, DON'T touch the eye piece with your finger!
2. Tube
The tube, also called a body tube, is next. It connects the eye piece to another part of the microscope. It is important because it allows the light to travel from other lenses to the eye piece, keeping the image aligned.
It is very important to keep the body tube free of dust, so be sure to always keep the eye piece lens in place and properly store the microscope!
3. Nosepiece
The nosepiece, sometimes called a revolving turret, can be easily turned to change the magnification power of the microscope. It can hold different lenses, which makes it easy to change the power of magnification. Typically the nosepiece holds three or four other lenses that can magnify the specimen anywhere from 4x to 100x the power.
A good tip when using a microscope is to always remember to gently rotate the lenses on the nosepiece. Any rough handling could damage the components.
4. Large Objective Lens
The microscope in the picture has three objective lenses, and the number indicates the largest one. These are the lenses attached to the revolving turret of the microscope.
In this case, the small objective lens has a magnification of 4x, the medium has 10x, and the large has 40x. If course, this means that when used with the magnification offered by the eye piece, the large objective lens helps produce a real image of the specimen that is enlarged 400x.
5. Coarse Focus
Most microscopes have a coarse focus and a fine focus that are separate knobs, but some only have a coarse focus knob. The fine focus knob is placed beside or sometimes on top of the coarse focus knob; it is difficult to tell in this picture if that is exactly the case.
The coarse adjustment knob allows for a rapid rough focus of the specimen being studied. It moves the stage in larger increments than the fine focus knob. Sources suggest that it is best to use a lower magnification lens with the coarse adjustment knob first in order to avoid any contact between the lens and slide while using the coarse adjustment knob.
If a microscope lacks a fine adjustment knob it is because it is being used for basic viewing and precise focusing is not as important.
6. Stage
The flat platform on a microscope is called the stage. It provides a safe and relatively secure place to place and view the specimen. Some microscopes have a mechanical stage that allows for the slide to be moved around using knobs, while on others the stage is stationary except when being moved with the coarse focus knob.
7. Stage Clips
But what would the stage on a microscope be without the stage clips? They provide the mechanisms that ensure that the slide is held safely in place. Have you ever noticed the odd way a slide can move around? If you move the slide to the left, what you really see is what is on the right of the slide and vice versa.
This is because the microscope vertically and horizontally flips the image! Even a slight movement of the slide can change the quality of what is being viewed.
8. Illuminator
The illuminator provides the light source for a microscope that is needed to see what is on the specimen slide. Back in the day, it was a mirror that reflected light from an outside source, which made it possible to operate the microscope without the use of electricity. It might have also, however, contain a built-in lamp. (I don't remember using a microscope that had a built-in lamp. It really wasn't that long ago, though, so perhaps it did!). The illuminator can also be enhanced if needed with ring lights that come with a variety of different light sources, such as LED or UV.
If you're using a microscope with a built-in lamp, always be sure to let the illuminator cool before putting it away, and don't touch the bulb with your fingers!
9. Arm
The arm of a microscope has the important function of connecting the tube to the bottom of the machine. Some microscopes have focus knobs located on the arm. It is also the main structural support of the entire upper part of the microscope, and is the part that is used to pick up the instrument. Remember the rule! You pick up the microscope by the arm with one hand, and support the base with the other!
10. Base
The base is the bottom support of a microscope. It is what enables a microscope to stand upright and be stable during use. Many microscopes have bases that also incorporate the illuminator, or light source.
And - don't forget! One hand on the arm, the other hand on the base when moving the microscope!
This quiz was reviewed by FunTrivia editor rossian before going online.
Any errors found in FunTrivia content are routinely corrected through our feedback system.