FREE! Click here to Join FunTrivia. Thousands of games, quizzes, and lots more!
Quiz about Bitter Knitters

Bitter Knitters Trivia Quiz


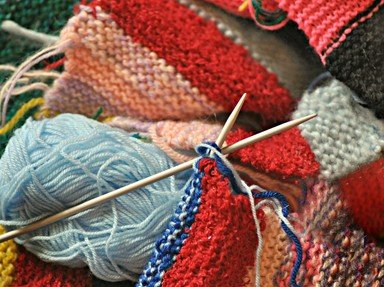
Knit one, purl two; things go wrong, what to do?

A photo quiz by looney_tunes. Estimated time: 6 mins.
  1. Home
  2. »
  3. Quizzes
  4. »
  5. Hobbies Trivia
  6. »
  7. Needlework
  8. »
  9. Knitting

Author
looney_tunes
Time
6 mins
Type
Photo Quiz
Quiz #
367,138
Updated
Dec 03 21
# Qns
10
Difficulty
Average
Avg Score
6 / 10
Plays
688
Awards
Top 35% Quiz
Last 3 plays: hosertodd (6/10), Rumpo (8/10), AK_Aussie (6/10).
-
Question 1 of 10
1. All ready for my new project, I knit a small square called (where I live) a gauge sample, and counted how many stitches and rows there were in a 5cm square. Whoops! I only had 12 stitches, and the pattern said I should have 15. What on earth should I do to fix this problem? Hint


Question 2 of 10
2. The pattern I was following said I should work 10 cm of k1, p1 ribbing, to produce the stretchy effect of the illustrated material. I duly cast on 121 stitches, as required for my size, and worked a couple of rows, starting with a knit stitch on each row. Horrors! It didn't look at all right, but had an uneven bumpy look. What went wrong? Hint


Question 3 of 10
3. Finished the ribbing, I started in on the stockinette stitch that was to form the next part of my project. I expected to see a smooth surface, like that of your standard sweater/jumper, but was appalled when I spread it out after a number of rows to see that it was all bumpy, like the picture. So where did I go wrong? Hint


Question 4 of 10
4. So there I was, knitting away with my lovely handspun llama yarn, when all of a sudden I found I had used up the entire ball! Since I was in the middle of a row, how did my knitting guide advise me to address this problem? Hint


Question 5 of 10
5. There I was, knitting away, and things seemed to be going swimmingly. Then I spread it out to admire my handiwork, and I saw a big hole in the middle of my work! Which of these might I have accidentally done to produce this? Hint


Question 6 of 10
6. I dug up a fairly old pattern, passed down from my grandmother, for a pair of socks, and it recommended using double-pointed needles. Since I didn't have any of them, I decided to just adapt the instructions and use regular knitting needles. Why did I discover that this was a poor idea? Hint


Question 7 of 10
7. Crumbs, I was supposed to be increasing at each end of the row on every twentieth row, but for the life of me I couldn't remember how many rows I had worked since the last increase. What handy device should I have employed to avoid this? Hint


Question 8 of 10
8. I knew I should never have tried something as tricky as this cable pattern! I was sure I had followed all the complex instructions, but when I held it up to compare with the picture, I found that the pieces in the middle appeared to cross right over left, instead of left over right. What had I done wrong this time? Hint


Question 9 of 10
9. This project might have been a bit ambitious for me, I guess. I could have sworn I followed all the instructions, but when I was finished I found there were all of these little gaps around the colored patches. Is there a quick way to fix this?


Question 10 of 10
10. The beanie was going fine until I got to the mystifying instruction that I had to decrease a stitch in every eight on the next row. I couldn't decide whether I should use k2tog or slip-k-psso in order to decrease the necessary stitches. Panic! Which should I have chosen? Hint


(Optional) Create a Free FunTrivia ID to save the points you are about to earn:

arrow Select a User ID:
arrow Choose a Password:
arrow Your Email:


View Image Attributions for This Quiz

Most Recent Scores
Jan 04 2025 : hosertodd: 6/10
Dec 12 2024 : Rumpo: 8/10
Dec 08 2024 : AK_Aussie: 6/10
Nov 29 2024 : pusdoc: 5/10

Score Distribution

quiz
Quiz Answer Key and Fun Facts
1. All ready for my new project, I knit a small square called (where I live) a gauge sample, and counted how many stitches and rows there were in a 5cm square. Whoops! I only had 12 stitches, and the pattern said I should have 15. What on earth should I do to fix this problem?

Answer: Use a smaller set of knitting needles

I clearly make my stitches larger than the pattern expects for an average knitter, so I need to adjust this in order for the shape and size of my final product to be as desired. The recommendation I found in my knitting guide was to use a smaller size needle.

This will make the stitches smaller, so more of them fit into the measured width. While I could try to wrap the yarn around the knitting needles more tightly as I knit, I am likely to slip back into my 'normal' feel, and the stitches will get too large again. If I haven't actually committed myself to using the particular yarn that I used for the sample, another possible strategy would be to use a thinner yarn. Most knitters, however, have already bought their yarn and are raring to get knitting, so this is not usually an acceptable option.
2. The pattern I was following said I should work 10 cm of k1, p1 ribbing, to produce the stretchy effect of the illustrated material. I duly cast on 121 stitches, as required for my size, and worked a couple of rows, starting with a knit stitch on each row. Horrors! It didn't look at all right, but had an uneven bumpy look. What went wrong?

Answer: I should have started alternate rows with a purl stitch

With an odd number of stitches, I was starting and ending each row with a knit stitch. To produce ribbing, the even-number rows would have to start and end with a purl stitch, since the back of a purl stitch looks like a knit stitch (and vice versa), producing the desired effect of a vertical column (or rib) of knit stitches alternating with a column of purl stitches. Since I started each one with a knit stitch, the effect is called seed stitch (or moss stitch, or possibly other names, too) - in each column you seem to see alternating knit and purl stitches. This is a very nice stitch, used in many patterns, but it doesn't stretch the way rib stitch does. I was glad I noticed after only a few rows, and didn't have too much work to unravel before I started over.

Some knitters prefer to make a slight change in the number of stitches - had I used 120 stitches, I could have started each row with a knit stitch. Increasing a stitch in the last row of ribbing would then have given me the right number of stitches for the rest of the pattern, and the one-stitch difference is usually indiscernible.
3. Finished the ribbing, I started in on the stockinette stitch that was to form the next part of my project. I expected to see a smooth surface, like that of your standard sweater/jumper, but was appalled when I spread it out after a number of rows to see that it was all bumpy, like the picture. So where did I go wrong?

Answer: I should have looked at the front instead of the reverse side

Stockinette stitch is the standard used for many plain-textured garments. You knit across the front side, and purl across the reverse. The front looks like a smooth series of intertwined stitches, but the reverse shows all the loops formed as they connect. Of course, I might have planned to use reverse stockinette for effect, but that wasn't the case in this project. Turning my work over, I was relieved to see that it did indeed look as expected.

Either knitting or purling every row produces a stitch called garter stitch, which looks rather like the picture, and is the same on both sides. Alternating knit and purl stitches in each row would have produced either ribbing or seed stitch instead of stockinette stitch.
4. So there I was, knitting away with my lovely handspun llama yarn, when all of a sudden I found I had used up the entire ball! Since I was in the middle of a row, how did my knitting guide advise me to address this problem?

Answer: Unpick that row, and attach the new ball at its start

The official advice is that you should always attach a new ball at the start of a row, so that the attachment doesn't interfere with the texture of your work. You should leave a long enough end on each piece so that it can be woven in for security later on (part of the dreaded finishing process). Opinions differ as to whether the two pieces should be knotted before being woven in. As you get near the end of a ball, it is a good idea to check before starting each row whether there is enough left to get to the end. A useful rule of thumb for plain knitting is to have enough yarn to cross the piece three times, but this won't work for complex patterns.

I am a lazy knitter, and having misjudged whether I would finish the next row and ending up near the middle of a row, I decided to not worry about it, and just attach the new ball, working a couple of rows before gently connecting the pieces in an overhand twist. If you do this carefully, you can get away with it, but it is definitely not recommended.
5. There I was, knitting away, and things seemed to be going swimmingly. Then I spread it out to admire my handiwork, and I saw a big hole in the middle of my work! Which of these might I have accidentally done to produce this?

Answer: Wrapped the yarn around the needle between stitches

Wrapping the yarn around the needle is a standard technique for producing an intentional hole, and is widely used in lacy patterns. However, doing it accidentally in the middle of plain knitting has an undesired effect. When the extra loop is worked in the next row, you get an extra stitch, and can see a small hole in the work. I have never worked out how to fix it smoothly when my daughter does this, other than ripping out the work back to that point.

If the problem occurred many rows earlier, it will be fastest to take the work off the needles and just pull the stitches out until you are back to before the error, then put them back on the needles and proceed. If there aren't many rows, it may be easier (and certainly less disheartening) to undo your work one stitch at a time, and avoid the risk of dropping one while ripping back. Over the years, I have become very good at unpicking even complex patterns.
6. I dug up a fairly old pattern, passed down from my grandmother, for a pair of socks, and it recommended using double-pointed needles. Since I didn't have any of them, I decided to just adapt the instructions and use regular knitting needles. Why did I discover that this was a poor idea?

Answer: The finished socks had an uncomfortable seam where the edges were joined

When you knit with two needles, you (generally) produce a flat piece of knitted material. To turn it into a tubular shape such as a sock, it is necessary to join two edges, which leaves a slight ridge no matter how carefully you proceed. Knitting with double-pointed needles, as shown in the photo, you produce a cylindrical piece of work. For much of the time, you can produce stockinette stitch by simply knitting continuously - there are no rows, you just go round and round. Things get a bit more tricky when you need to shape the heel, though, so properly-shaped socks are not a beginner's project.

Most contemporary knitters use circular needles (a piece of plastic with needle points on each end) for a similar effect. They come in various sizes, both of the needle end and of the connecting plastic loop, so can be used pretty much whenever double-pointed needles are called for.
7. Crumbs, I was supposed to be increasing at each end of the row on every twentieth row, but for the life of me I couldn't remember how many rows I had worked since the last increase. What handy device should I have employed to avoid this?

Answer: Row counter

Stitch counters come in many forms. The one in the picture is designed to fit on a knitting needle (near the back end, not the working end), and the knitter adjusts the count by rotating the appropriate wheel at the end of each row. Of course, it is only as useful as the knitter's faithful registration of their progress. Since I am dreadful with that, I have become highly skilled at rapidly counting rows manually.
8. I knew I should never have tried something as tricky as this cable pattern! I was sure I had followed all the complex instructions, but when I held it up to compare with the picture, I found that the pieces in the middle appeared to cross right over left, instead of left over right. What had I done wrong this time?

Answer: Held the cable needle in front of the work instead of behind it

To produce a basic cable, you slip a given number of stitches onto a small needle called a cable needle (or use a double-pointed needle or even a crochet hook, if you're desperate), work some stitches from the left needle, then work the stitches from the cable needle. If you hold the cable needle behind the work while you work the next stitches, the finished effect makes it look as if the stitches cross left to right, as in the centre of the picture. The cables on the sides, which seem to cross the other way, were produced by holding the cable needle in front of the work.

If you're really good at correcting your work, a single reversed cable can be worked down to on the relevant stitches and worked the other way, before picking up stitches to where you were. In most cases, however, it will be easier to produce an attractive pattern if you take everything out and do it again from the point of cabling.
9. This project might have been a bit ambitious for me, I guess. I could have sworn I followed all the instructions, but when I was finished I found there were all of these little gaps around the colored patches. Is there a quick way to fix this?

Answer: No

These gaps are produced when you don't twist the yarns around each other when changing colors. The stitches in each block tend to pull in on themselves, and away from the other color, creating gaps. The lack of continuity in tension also makes these weak spots in your work. There is no good solution other than starting over. Next time, I will remember to twist as I change colors!
10. The beanie was going fine until I got to the mystifying instruction that I had to decrease a stitch in every eight on the next row. I couldn't decide whether I should use k2tog or slip-k-psso in order to decrease the necessary stitches. Panic! Which should I have chosen?

Answer: Either one would work fine in this case

Both of these are standard ways to decrease a stitch. K2tog (knit two stitches together at the same time, as if they were a single loop) produces a stitch with a slant towards the right, while slip-k-psso (slip a stitch to the right needle, knit a stitch, pass the slipped stitch over the knit stitch) produces one which slopes to the left.

When shaping work and using these on the edges, this effect needs to be considered. In a beanie, where the decrease stitches are spaced across each row, you can use either.

The important thing for a tidy appearance is to use the same decrease method every time, and not to change.
Source: Author looney_tunes

This quiz was reviewed by FunTrivia editor ozzz2002 before going online.
Any errors found in FunTrivia content are routinely corrected through our feedback system.
Related Quizzes
This quiz is part of series Authoring Masterclass - Team Looney:

In 2014 we ran a Masterclass challenge, in which teams of four worked with an editor to write quizzes with six different focus areas chosen to make us take a look at how we approach the art of quiz writing. These quizzes were produced by my team.

  1. From a Cloud's Peak, ten Virginians Speak Tough
  2. Noble Warriors Average
  3. Great Hamburgers! Average
  4. Fish in a Tool Shed Average
  5. Bitter Knitters Average
  6. Towards the Ancient Theater of Epidaurus Average
  7. Straight On Till Morning Average
  8. From Here to There Average
  9. Let's Go to Laos Average
  10. Into the Fire Average
  11. Myths and History in Greek Geography Tough
  12. Czechia Easier

1/20/2025, Copyright 2025 FunTrivia, Inc. - Report an Error / Contact Us